NestJS is a progressive Node.js framework that allows you to build fast, scalable, and maintainable Node.js applications. In this tutorial, I will show you how to create your first NestJS API using TypeScript and Express.
# Prerequisites
To follow this tutorial, you will need:
- Node.js v16 or later
- A basic understanding of TypeScript and Node.js
# Creating a new NestJS project
To create a new NestJS project, you can use the Nest CLI, which is a command-line tool that helps you generate and manage your NestJS applications. To install the Nest CLI, run the following command in your terminal:
bashnpm i -g @nestjs/cli
After that's done, create a new project with:
bashnest new nestjs-api
This will prompt you to choose a package manager (npm, yarn, or pnpm) and then create a new folder called nestjs-api with the following structure:
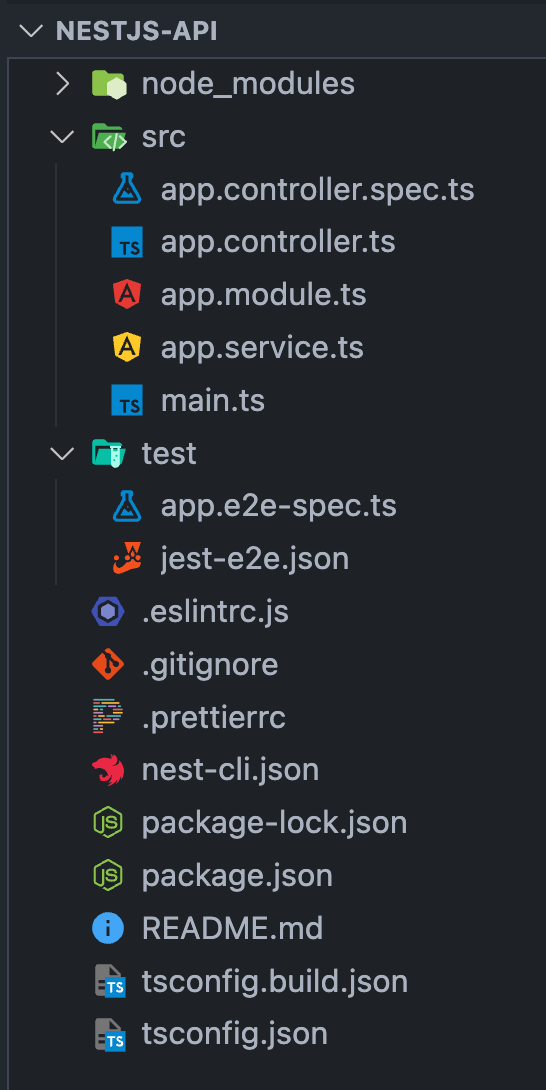
Here are some quick points on this folder structure:
- The
srcfolder contains the source code of your application. - The
main.tsfile is the entry point of your application, where you bootstrap the NestJS app module. - The
app.module.tsfile is the root module of your application, where you define the components (controllers, providers, etc.) that belong to this module. - The
app.controller.tsfile is a controller that handles incoming requests and returns responses. - The
app.service.tsfile is a service that provides some functionality for the controller. - The
testfolder contains the end-to-end tests for your application. - The rest of the files are configuration files for NestJS, TypeScript, Jest, ESLint, and Prettier.
To run your application, navigate to the project folder and run:
bashnpm run start:dev
This will start your application in development mode, with hot reload enabled. You should see a message like this in your terminal:

Open your browser and go to http://localhost:3000 to see a “Hello World!” message. You did it! 🎉
# Creating a module
To organize our code better, we will create a module that will contain the CRUD (Create Read Update Delete) functionality for our API. A module is a class annotated with the @Module() decorator, which provides metadata that NestJS uses to create the module's dependency graph. A module can import other modules, declare controllers and providers, and export them to other modules.
To create a module, we can use the NestJS CLI with this command:
bashnest generate module todos
This will create a new folder called todos inside the src folder, with a file called todos.module.ts. It will also update the app.module.ts file to import the TodosModule. The todos.module.ts file should look like this:
tsimport { Module } from '@nestjs/common';

@Module({})
export class TodosModule {}
# Creating a service
A service is a class that provides some functionality to our application. It is usually annotated with the @Injectable() decorator, which tells NestJS that this class can be managed by the dependency injection system. A service can inject other services or modules using constructor parameters.
To create a service for our todos module, we can use the NestJS CLI with this command:
bashnest generate service todos/todos
This will create two files inside the todos folder: todos.service.ts and todos.service.spec.ts. The first one is the service file, and the second one is the unit test file for the service. It will also update the todos.module.ts file to include the TodosService as a provider. The todos.service.ts file should look like this:
tsimport { Injectable } from '@nestjs/common';

@Injectable()
export class TodosService {}
# Creating a controller
A controller is a class that handles incoming requests and returns responses to the client. It is usually annotated with the @Controller() decorator, which provides metadata that NestJS uses to create routing map. A controller can have one or more methods that handle different endpoints and HTTP methods. Each method can be annotated with a decorator such as @Get(), @Post(), @Put(), or @Delete(), which specify the path and the HTTP method for the route.
To create a controller for our todos module, we can use the NestJS CLI with this command:
bashnest generate controller todos/todos
This will again create two files inside the todos folder: todos.controller.ts and todos.controller.spec.ts. The first one is the controller file, and the second one is the unit test file for the controller. It will also update the todos.module.ts file to include the TodosController as a controller. The todos.controller.ts file should look like this:
tsimport { Controller } from '@nestjs/common';

@Controller('todos')
export class TodosController {}
The @Controller() decorator takes a string as an argument, which is the prefix for the routes handled by this controller. In this case, we use 'todos' as the prefix, which means that all the routes in this controller will start with /todos.
# Making your API do stuff
Now that we have our Todos module, service, and controller set up, let's add some CRUD (Create, Read, Update, Delete) operations to our API.
# Implementing the Service
First, let's update our TodosService to handle CRUD operations. Open todos.service.ts and modify it as follows:
tsimport { Injectable } from '@nestjs/common';

@Injectable()
export class TodosService {
  private todos = [];

  create(todo) {
    this.todos.push(todo);
    return todo;
  }

  findAll() {
    return this.todos;
  }

  findOne(id) {
    return this.todos.find((todo) => todo.id === id);
  }

  update(id, updatedTodo) {
    const todo = this.findOne(id);
    if (todo) {
      Object.assign(todo, updatedTodo);
      return todo;
    }
    return null;
  }

  remove(id) {
    const index = this.todos.findIndex((todo) => todo.id === id);
    if (index !== -1) {
      this.todos.splice(index, 1);
      return true;
    }
    return false;
  }
}
Here, we define a simple array todos to hold our todo items. Each CRUD operation is represented by a method in our service. For example, create() adds a new todo, findAll() retrieves all todos, findOne() retrieves a specific todo by its ID, and so on.
# Implementing the Controller
Next, let's update our TodosController to handle HTTP requests and use our TodosService. Open todos.controller.ts and update it like so:
tsimport { Body, Controller, Delete, Get, Param, Post, Put } from '@nestjs/common';

import { TodosService } from './todos.service';

@Controller('todos')
export class TodosController {
  constructor(private readonly todosService: TodosService) {}

  @Post()
  create(@Body() todo) {
    return this.todosService.create(todo);
  }

  @Get()
  findAll() {
    return this.todosService.findAll();
  }

  @Get(':id')
  findOne(@Param('id') id) {
    return this.todosService.findOne(id);
  }

  @Put(':id')
  update(@Param('id') id, @Body() updatedTodo) {
    return this.todosService.update(id, updatedTodo);
  }

  @Delete(':id')
  remove(@Param('id') id) {
    return this.todosService.remove(id);
  }
}
In this controller, we're using decorators like @Post(), @Get(), @Put(), and @Delete() to map HTTP methods to controller methods. The @Body() and @Param() decorators are used to extract values from the request body and parameters.
# Testing the API
To test your API, I'd recommend using Insomnia, an API client that makes it easy to send HTTP requests and view responses.
Once you have Insomnia installed, you can manually configure it to send requests to your API. Make sure your application is running by executing npm run start:dev first.
Here are some example actions you can perform with Insomnia:
- Create a new todo:
- Method: POST
- URL: http://localhost:3000/todos
- Headers:
Content-Type: application/json - Body:
{"id": 1, "title": "First Todo"}
- Get all todos:
- Method: GET
- URL: http://localhost:3000/todos
- Get a single todo by ID:
- Method: GET
- URL:
http://localhost:3000/todos/1
- Update a todo by ID:
- Method: PUT
- URL: http://localhost:3000/todos/1
- Headers:
Content-Type: application/json - Body:
{"title": "Updated Todo"}
- Delete a todo by ID:
- Method: DELETE
- URL: http://localhost:3000/todos/1
Congratulations! You've just built a simple but functional CRUD API using NestJS. This should provide a solid foundation for you to expand upon for more complex applications.
# What's Next?
You've successfully built a CRUD API using NestJS, complete with modules, services, and controllers. You've also learned how to test your API using Insomnia.
As you continue your journey with NestJS, here are some avenues for further exploration:
- Data Validation and Error Handling: Look into NestJS's built-in validation and exception filters to make your application more robust and user-friendly.
- Database Integration: Take your application to the next level by connecting it to a database. Whether it's an SQL or NoSQL database, NestJS offers various libraries and techniques to handle database operations seamlessly.
- Authentication and Authorization: Secure your API by implementing authentication strategies like JWT (JSON Web Token) or OAuth.
- Automated Testing: Writing unit and end-to-end tests is crucial for maintaining a reliable codebase. NestJS provides powerful testing utilities to help you achieve that.
By following this tutorial, you've taken significant steps toward mastering NestJS, enabling you to build more complex and scalable applications in the future. In the next few guides in this series, we'll talk more about introducing Docker to your NestJS application, hooking it up with Sentry, and deploying it to DigitalOcean.
Until next time — happy coding!
